ReactiveX and Unity3D: part 3
In the final article of this series, we'll add jumping and sound effects to our first person controller. This will be the result:
Jumping to a conclusion
It's tempting to try to separate the code for WASD-movement and jumping entirely. However this would involve
calling Move on the CharacterController more than once per frame. At the very least
this seems wasteful, and it's potentially prone to bugs. It also raises questions of execution order and
responsibility for the output signals. Instead let's find a way to combine these signals and calculate all
movement at once. Combining signals is a common need, so there are tools to help us.
Ultimately we'll use Zip, which combines two (or more) Observables by taking a value from each and
running them through a function you provide. (This is a great time to check out the fantastic interactive marble
diagrams.)
observableA.Zip(observableB, (a, b) => /* combine a and b */);This gives us an Observable whose type is the return type of our combination function. Let's use a simple struct to package our input values.
public struct MoveInputs {
  public readonly Vector2 movement;
  public readonly bool jump;

  public MoveInputs(Vector2 movement, bool jump) {
    this.movement = movement;
    this.jump = jump;
  }
}
This may be more verbose than you're used to for struct definitions: it's common to leave struct fields mutable
and ditch the constructor. I think it's worth the effort to make them readonly. You really don't
want people messing with the values in your Observables, accidentally or purposefully. Immutability is a virtue.
Now that we know how we'll combine things, how should we define our jump signal? You might do:
this.UpdateAsObservable()
  .Select(_ => Input.GetButton("Jump"));
Imagine combining this with our movement signal. Can you spot the bug? Recall that our movement signal produces
a value every Fixed Update. Update and Fixed Update do not run at the same rate (except, possibly, by
coincidence). However Zip doesn't know anything about the intended frequency of your signals, it
just takes items one-by-one, patiently waiting for the slow signal while values "pile up" on the fast signal.
When I tested this, the jump command lagged, getting progressively worse as the game ran. I'm not sure if
Zip's internal buffer would have eventually overflowed and crashed, or just started dropping
values. Either way, not good. So, simple fix, right?
this.FixedUpdateAsObservable()
  .Select(_ => Input.GetButton("Jump"));
Unfortunately no. Input sampling is tied to Update, so if we sample it during Fixed Update we could easily miss key presses (or, if your frame rate got really wonky, potentially count key presses multiple times).
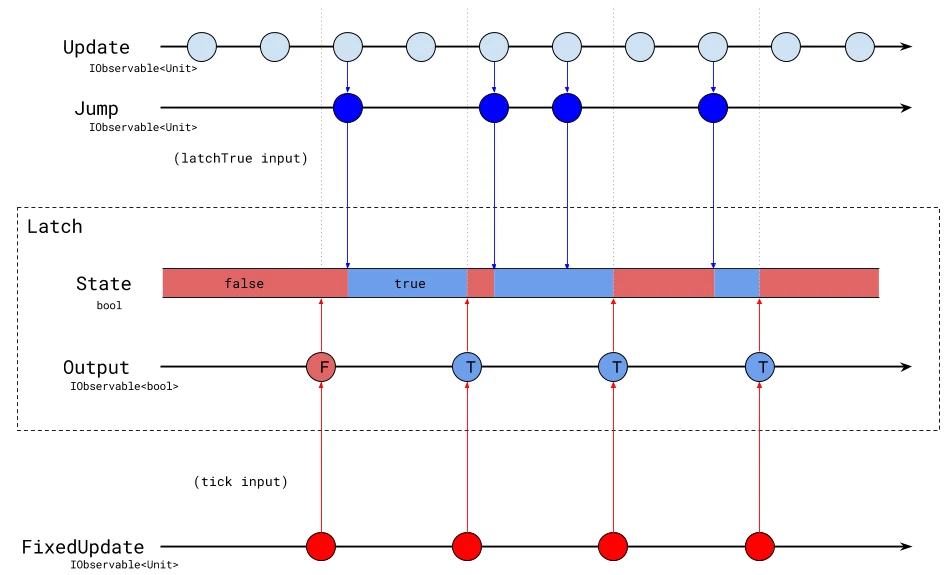
So we need to sample input during Update, but keep key presses around until Fixed Update happens and then clear it. I'm going to take some (loose) inspiration from digital circuit design and call this a Latch. We'll implement Latch with a custom Observable. Our inputs are a data signal—our key presses—and a clock signal telling us when to produce output—Fixed Update.
First, how do we create an Observable from scratch? So far we've only transformed existing Observables. The most
fundamental way is with the Create method like this:
Observable.Create<T>(observer => {
  // Now use the observer instance to implement the
  // Observable's behavior.

  // To send a value: observer.OnNext(value)
  // To terminate with an error: observer.OnError(exception)
  // To complete: observer.OnCompleted()

  // Return an IDisposable,
  // which is used to clean up whatever we create.
  return diposable;
});
If that looks really free-form, that's because it is! This interface gives you a lot of freedom to implement all sorts of behaviors as signals. You can use other Observables, you can load websites or resources from files, you could do absolutely nothing! All up to you. I'm going to skip over the finer details here, but they are important if you're going to be creating Observables on your own. Intro to Rx is a great resource to learn more about that, and well, everything in further detail. It's even written towards C#. Convenient!
So, properly warned Here There Be Dragons, let's see it in action. Our Latch Observable will internally subscribe to our data and clock signals, as well as maintain the latch state. Before we jump into the code, here's a marble diagram.
And now for that code.
public static IObservable<bool> Latch(
    IObservable<Unit> tick,
    IObservable<Unit> latchTrue,
    bool initialValue) {

  // Create a custom Observable.
  return Observable.Create<bool>(observer => {
    // Our state value.
    var value = initialValue;

    // Create an inner subscription to latch:
    // Whenever latch fires, store true.
    var latchSub = latchTrue.Subscribe(_ => value = true);

    // Create an inner subscription to tick:
    var tickSub = tick.Subscribe(
      // Whenever tick fires, send the current value and reset state.
      _ => {
        observer.OnNext(value);
        value = false;
      },
      observer.OnError, // pass through tick's errors (if any)
      observer.OnCompleted); // complete when tick completes

    // If we're disposed, dispose inner subscriptions too.
    return Disposable.Create(() => {
      latchSub.Dispose();
      tickSub.Dispose();
    });
  });
}
Notice the two inner subscriptions are properly prepared for disposal. Otherwise they could continue to live beyond their need, leaking memory and wasting CPU.
The subscription to tick includes a detail we haven't dealt with yet: the OnError and
OnCompleted handler functions. Up to this point we haven't really seen an Observable that we expect
to throw errors or terminate. A good example is an Observable that loads a resource from the web: if the
connection is down it would error out, if it succeeded it would fire a single value and then terminate. The 2-
and 3-argument variants of Subscribe let us provide functions to handle those cases. In this case,
I don't want to try to do anything clever with error or completed signals, so I'll just pass them through to the
observer. If tick produces an error, so will I.
You might question the correctness of accessing value from two separate asynchronous processes.
You're right to scrutinize that, but I think the effects of a potential race-condition are negligible here (the
same hand-waving I did over the run input, if you recall).
With Latch thus defined, we can finally put all of this together to produce an
IObservable<MoveInputs>.
Jump = this.UpdateAsObservable()
  .Where(_ => Input.GetButtonDown("Jump"));
var jumpLatch = CustomObservables
  .Latch(this.FixedUpdateAsObservable(), Jump, false);
MoveInputs = Movement
  .Zip(jumpLatch, (m, j) => new MoveInputs(m, j));
We have now successfully coordinated two very different input signals: one continuous (WASD keys held down), the other instantaneous (Space pressed and released).
Back in PlayerController we change inputs.Movement.Subscribe(...) to
inputs.MoveInputs.Subscribe(...) and the rest is straight-forward (full code below).
Similar to our controller's output signal Walked: we can also add signals for Jumped
and Landed in this calculation. And with a separate subscription to Walked and a bit
of math, we can also create a Stepped signal to simulate our footsteps. We'll need these to add
sound effects.
Sounds to astound
We would really be doing our players a disservice not to provide sound effects! Thankfully with all the work
we've done so far, this is a piece of cake. We use a simple Unity script, PlayerAudio, to configure
our AudioClips and AudioSource, and create simple subscriptions like:
player.Jumped
  .Subscribe(_ => audioSource.PlayOneShot(jump))
  .AddTo(this);
I think this is a really elegant payoff for our setup. And it's not limited to sound effects. Adding visual effects or AI triggers in response to these events is now similarly trivial. We could easily track the number of times a player has jumped, say for an achievement system. Best of all, we can do all of this with sane, predictable, de-coupled code.
Conclusion
Thanks for making it all this way! I hope you're excited about trying these techniques yourself. The best place to continue learning is to check out the excellent documentation (with interactive marble diagrams!) provided by ReactiveX. UniRx is well-documented on its GitHub page. And the free online book Intro to Rx is a great way to learn the ins-and-outs and become a super-pro.