How to set up SQLite for Unity
SQLite is one of the most popular options for lightweight databases, so it's a great candidate for use in a Unity application when you want something a little more robust than a structured text file (JSON, XML, YAML, etc.) or C#'s serialized objects. As I found, setting up SQLite for Unity can be a bit of a headache, especially if you're not very familiar with native code plugins. (It took me the better part of a week, trial, error, and a heap of outdated forum posts to figure out.) This article aims to save you the headache.
Why DIY?
There are paid libraries on the Asset Store and free resources on Github that advertise quick-and-easy SQLite setup. And if you're looking for quick-and-easy, this isn't the article for you. What I'm offering is the step-by-step process to do it yourself. Why?
-
Security – if you import a .dll or .so file that someone else compiled and posted to a forum, you can't be 100% certain what code it contains. This method uses libraries from just two trusted sources: Unity and SQLite.
-
Reliability – the fewer authors involved in writing the code for your libraries, the fewer opportunities for bugs. This method uses code that is highly tested and in common use: no custom code.
-
Freedom – if you use someone's pre-packaged solution, you are stuck with whatever version of SQLite they choose to support, and when they choose to support it. This method gives you the freedom of knowing you will never have to wait for a critical code patch.
-
Coolness – doing it yourself makes you feel smart, and saves your cash for some other cool thing.
The downside is I can't guarantee that the steps that worked for me will also work for you, nor that they will continue to work for any amount of time. My development machine is running Windows 10, using Unity 2017.1.1f1 (64-bit), and I've tested builds for Windows, Mac, Linux, Android, and iOS. I tested this on real devices for each platform, but I only have a few of those to test on. Your mileage may vary.
Note: this method also requires setting API Compatibility settings to .NET 2.0 instead of the default .NET 2.0 Subset. This may increase the file size of your final builds. If you are worried about download sizes, I encourage you to measure the difference before and after.
Setup Steps
These instructions assume you want to target:
- Unity Editor,
- Standalone (Windows, Mac, and Linux; 32- and 64-bit),
- iOS, and
- Android (x86 and ARMv7).
If you're not interested in mobile, you can skip the iOS- and Android-specific sections.
1. Editor and Standalone support
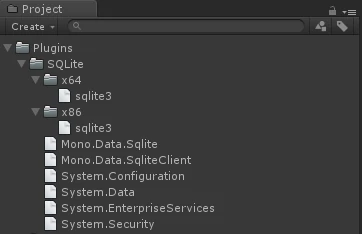
In your Unity project folder, add the following files and folders. (I'll explain where to get the files.)
[unity project folder]
 └─[Assets]
    └─[Plugins]
       └─[SQLite]
          Mono.Data.Sqlite.dll
          Mono.Data.SqliteClient.dll
          System.Configuration.dll
          System.Data.dll
          System.EnterpriseServices.dll
          System.Security.dll
          └─[x64]
             sqlite3.dll
          └─[x86]
             sqlite3.dll
The first group of DLLs are SQLite's dependencies. They come from Mono, the open-source .NET framework that
Unity uses. You can find these files in your Unity installation directory at:
\Editor\Data\Mono\lib\mono\2.0\. Simply copy and paste.
The next two DLLs are the run-times for SQLite itself, and you can download them from sqlite.org. Under the "Precompiled Binaries for Windows" section, you want the x86 version (for 32-bit) and the x64 version (for 64-bit). You don't need the tools bundle. Download the zips, extract the DLLs, and make sure to put them in the correct folder in your project. (For bonus security points, you should check the downloaded zips against the provided sha1 hashes.)
When that's done, here's what that might look like in Unity:
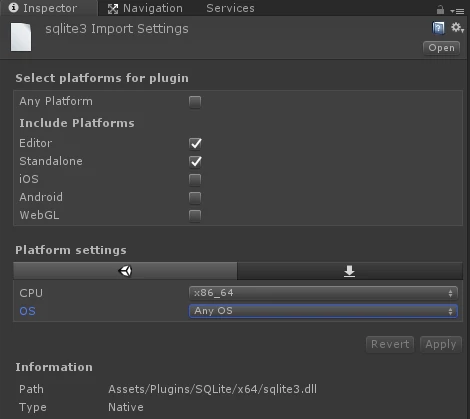
Now configure plugin settings for both SQLite DLLs. Click on the files to bring them up in the Inspector, then configure them for the Editor and Standalone platforms, and appropriate CPU architectures.
For example, here's the x64 DLL's settings:
and, switching tabs:
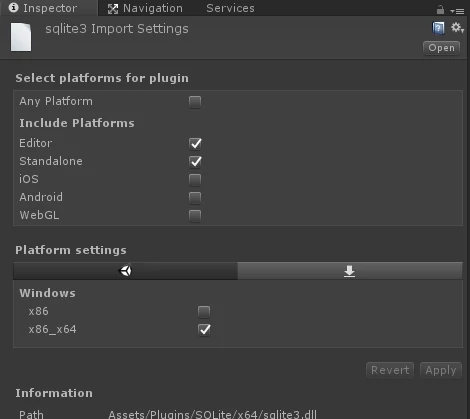
Note: don't leave "Any Platform" checked and exclude the other platforms; while that would seem to be the same thing, in my experience it didn't work the same way.
Finally, open the Player Settings for the Standalone player and under Other Settings, change Api Compatability Level to ".NET 2.0".
2. iOS support
Good news, this one's easy! All you need to do is open the iOS Player Settings and set its Api Compatibility Level to ".NET 2.0" also.
3. Android support
This is where it gets a little tricky. You need to compile the SQLite source code for Android. It's less scary than it sounds. If you're technically savvy enough to be interested in SQL in the first place, you can do this. Okay, here goes.
Install NDK, Android's Native Development Kit. Here's Android's guide for that, you can stop once you've got the tools installed.
Find the path to the ndk-build executable. This will depend on where Android Studio likes to
install components. On my machine, I found this in
C:\Users\Tyler\AppData\Local\Android\sdk\ndk-bundle\ as the file ndk-build.cmd.
Remember this path for later.
Download the SQLite source code from sqlite.org. You want the "amalgamation" zip under the "Source Code" section. Inside is a collection of .c and .h files.
Now we'll create the project structure that NDK expects. Create a folder somewhere (not in your Unity project),
extract the source code there, and re-arrange things into this file structure (you'll create the
Android.mk file yourself):
[ndk project folder]
 └─[jni]
    shell.c
    sqlite3.c
    Android.mk
    └─[include]
       sqlite3.h
       sqlite3ext.h
Create Android.mk in your favorite text editor with the following contents:
LOCAL_PATH := $(call my-dir)

include $(CLEAR_VARS)

LOCAL_LDLIBS := -llog

LOCAL_MODULE    := sqlite3
LOCAL_SRC_FILES := sqlite3.c

include $(BUILD_SHARED_LIBRARY)
This file tells NDK how to build the library.
Open up a command line and change directory to your jni folder. Execute ndk-build
there, with no arguments. (We found the path to this executable a few steps ago.) It should run for a while,
compiling SQLite for various CPU architectures and outputting .so files in a libs directory. We
care about two in particular:
[ndk project folder]
 ···
 └─[libs]
    └─[armeabi-v7a]
       libsqlite3.so
    └─[x86]
       libsqlite3.so
Copy those into your Unity project in some new subfolders, being careful not to mix them up. For example:
[unity project folder]
 └─[Assets]
    └─[Plugins]
       └─[SQLite]
          └─[android]
             └─[armeabi-v7a]
                libsqlite3.so
             └─[x86]
                libsqlite3.so
So now, your Unity project might look like this:

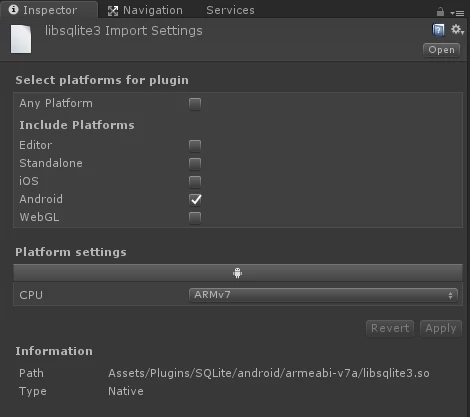
As before, we need to configure some settings for both of these plugin files. Click them to bring them up in the Inspector, and select them for the Android platform only, with the appropriate CPU architecture. For example, the ARMv7 version:
Finally open Player Settings, this time for Android, and switch to ".NET 2.0" API compatibility.
Some Example Code
A full tutorial on using .NET's System.Data package to interact with a database is beyond the scope of this article, but here's some example code just to see that it's working.
using System.Data;
using Mono.Data.Sqlite;
using UnityEngine;

namespace ExampleProject {

  public class SQLiteExample : MonoBehaviour {

    private string dbPath;

    private void Start() {
      dbPath = "URI=file:" + Application.persistentDataPath + "/exampleDatabase.db";
      CreateSchema();
      InsertScore("GG Meade", 3701);
      InsertScore("US Grant", 4242);
      InsertScore("GB McClellan", 107);
      GetHighScores(10);
    }

    public void CreateSchema() {
      using (var conn = new SqliteConnection(dbPath)) {
        conn.Open();
        using (var cmd = conn.CreateCommand()) {
          cmd.CommandType = CommandType.Text;
          cmd.CommandText = "CREATE TABLE IF NOT EXISTS 'high_score' ( " +
                            "  'id' INTEGER PRIMARY KEY, " +
                            "  'name' TEXT NOT NULL, " +
                            "  'score' INTEGER NOT NULL" +
                            ");";

          var result = cmd.ExecuteNonQuery();
          Debug.Log("create schema: " + result);
        }
      }
    }

    public void InsertScore(string highScoreName, int score) {
      using (var conn = new SqliteConnection(dbPath)) {
        conn.Open();
        using (var cmd = conn.CreateCommand()) {
          cmd.CommandType = CommandType.Text;
          cmd.CommandText = "INSERT INTO high_score (name, score) " +
                            "VALUES (@Name, @Score);";

          cmd.Parameters.Add(new SqliteParameter {
            ParameterName = "Name",
            Value = highScoreName
          });

          cmd.Parameters.Add(new SqliteParameter {
            ParameterName = "Score",
            Value = score
          });

          var result = cmd.ExecuteNonQuery();
          Debug.Log("insert score: " + result);
        }
      }
    }

    public void GetHighScores(int limit) {
      using (var conn = new SqliteConnection(dbPath)) {
        conn.Open();
        using (var cmd = conn.CreateCommand()) {
          cmd.CommandType = CommandType.Text;
          cmd.CommandText = "SELECT * FROM high_score ORDER BY score DESC LIMIT @Count;";

          cmd.Parameters.Add(new SqliteParameter {
            ParameterName = "Count",
            Value = limit
          });

          Debug.Log("scores (begin)");
          var reader = cmd.ExecuteReader();
          while (reader.Read()) {
            var id = reader.GetInt32(0);
            var highScoreName = reader.GetString(1);
            var score = reader.GetInt32(2);
            var text = string.Format("{0}: {1} [#{2}]", highScoreName, score, id);
            Debug.Log(text);
          }
          Debug.Log("scores (end)");
        }
      }
    }
  }
}
Throw that MonoBehaviour on an object in an empty scene and on start it should report something like the following in the Console:
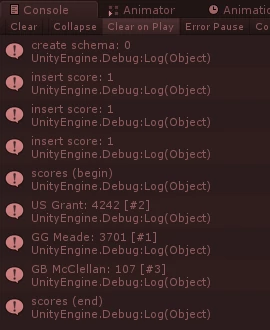
(Of course as written, this code will insert duplicate high scores each time you run it.)
All right, that's enough for this article. Hopefully that gets you started. Best of luck, and happy SQL-ing!